hardware showoff

@“milo”#p54109 Turns out that one of the creators of Star Control was office mates with one of the creators of Starflight, and then likewise that person helped out a little bit with work on some of the aliens in Star Control. So - the influence is very strong indeed!

I think this is jumping the queue and I'll check it out next.

@“sixteen-bit”#p54088 oh my god, for like ten seconds I just thought the series X and 360 were mismatched bookshelf speakers.

also the VCR Xbone can look downright enticing in the right light.

[upl-image-preview url=//i.imgur.com/IJ8iN15.jpeg]

[upl-image-preview url=//i.imgur.com/zqqfAfj.jpeg]

[upl-image-preview url=//i.imgur.com/XOrA4U1.jpeg]

I fully rebuilt my ITX HTPC in a Lian Li case after building my partner's giant Flight Sim PC. I had to redo the PSU and threw in a 240mm RGB AIO because the tiny case had such bad airflow. I like how looks like it belongs on an entertainment center now.

@"connrrr"#p54124 I love the VCR Xbone tooooo

@“robinhoodie”#p53921 very interesting! Hey @milo did you replace this on mine lol

@“exodus”#p54262

Looool I did not. I was aware of the thing but haven't heard about it actually happening so I totally forgot about it. Whoops!

@“fetus8”#p54145 smart move placing that air purifier next to your computer!!!

@“connrrr”#p54323 Thank you for noticing! That air purifier really helps with my allergies!!

I should really post my stuff in this thread - but for now here is a project I've been working on for my son:

https://twitter.com/copy_save/status/1486346195526164481

@“copySave”#p55671 wow, what a delightful project! Lucky kid :slight_smile:

@“kory”#p55677 Thanks! Yeah I hope he likes it. I plan to put it in the living room this fall when he‘s about to turn 3 then introduce more games as I gauge his interest. To start I chose 9 single screen arcade games that are easy to pick up and play, plus they’re foundational in terms of their mechanics. I have a giant list of what I plan to give him which took quite a while to compile based on age and preceding games in the list.

I really just wanted the console experience for him where you just turn it on and put a game in, without risk to old hardware or fiddling with upscalers. I looked at Evercades but I didn't like the selection of titles and having multiple games on a single cart. There were other NFC solutions that required EmulationStation to be loaded (which presents a giant overbearing list) and then it would load the game you place on the system, but it was more for adults who want little 3D printed replica carts (a step too far for me). I just load the script at boot, it puts up the "Insert Game Card" image I made, and then waits for an NFC card UID that I put in the script. When you take out the card, it kills the retroarch process and goes back to the "Insert Game Card" screen. The cards themselves are like $40 for 100 of them and I just print label stickers. I also plan to make simple boxes with card stock and black and white manuals. It'll be nice to hand him a game and talk about it instead of just picking it from a list.

Obviously this won't last forever, and I'll eventually just have it boot to ES with all the games, but while he's too young to really know about modern gaming stuff I figured I'd take advantage and play a bunch of great 8 and 16-bit games with him and do it in an orderly and progressive fashion (thinking a new game every 2 weeks for a few years). Better than just giving him tablet, or a Switch or an Xbox with Rocket League and Fortnite when he turns 5.

(I do plan to give him an old quad core PC with Linux when he turns 5 that can handle PS1, Saturn, N64, Dreamcast, and PSP and continue to give him games on CD-Rs that loads retroarch on disc insert. There will be an android handheld, modded Wii and PS2 in the mix as well. Hopefully I can keep up the facade until he turn 8 or 9...)

@“milo”#p54321 heck, maybe I'll bring it back for that then ha ha

@"copySave"#p55681 this is really neat!!! is that an nes micro as a shell, or is the micro still in there? (or am I totally wrong?)

@“exodus”#p55688 Thanks! It‘s not a NES classic or micro. It’s made up of:

  • - Raspberry Pi 3b (can play up to NeoGeo, GBA, and most PS1)
  • - 5.25V - 3A power supply (needed extra juice for NFC reader and case IO board)
  • - 64gb micro sd card with Retropie installed (not pre-loaded. All games were hand selected by me)
  • - [Waveshare Raspberry Pi PN532 NFC HAT](https://www.amazon.com/Raspberry-Interface-Communication-Supports-Provided/dp/B07WHGFN6Z) (just slots onto the Pi's GPIO pins)
  • - [Retroflag NESPi Case+](https://www.amazon.com/Retroflag-Functional-Shutdown-Heatsinks-Raspberry/dp/B07872ZDCS/ref=sr_1_4?crid=2P1LSPVF7YKIC&keywords=retroflag+nespi+case&qid=1643226753&s=electronics&sprefix=retroflag+nespi+case%2Celectronics%2C62&sr=1-4) (Had enough height to fit everything inside. Power and Reset buttons work, but Reset reboots the whole machine instead just of the game. Easier to just take the game out and put it back in. Also I know the Mk III or PCE would be more appropriate with cards but I don't have a 3D printer)
  • - transparent credit card holder for smartphones (just sticks onto the top of the case)
  • - 2.4 Ghz NES style controllers (will eventually introduce SNES and 6btn Genesis. PCE and MK III games can use the NES pad)
  • - generic PN532 NFC cards and label stickers (same as hotel key cards)
  • The case wasn't quite tall enough to fit the connector for the front power buttons and usb onto the NFC hat, so I had to solder some Dupont patch wires to a right angle adapter that fit over the GPIO pins. This avoided any soldering to actual components.

    I took the generic testing Python script that the NFC hat came with and modified it to load the games using some examples I found online.

    Sucks that Raspberry Pis have gotten so expensive (I got mine for $35 4 years ago) but if you have one laying around the other parts are still pretty cheap.

    Edit: Made quick blog post with my Python script and some instructions: https://copy-save.blogspot.com/2022/01/raspberry-pi-with-nfc-cards-for-my-son.html

    Following up from my previous posts, here is the box art using some of my own design liberties (PAL art with yellow instead of black, modified back, and red stripe with controller icon). Using card stock paper and greeting card holder boxes. Sells the illusion pretty well I think!

    [upl-image-preview url=//i.imgur.com/RtTNVFa.jpeg]

    [upl-image-preview url=//i.imgur.com/VPWL92P.jpeg]

    This is how I intend to gift him games in the future. The first 8 from the twitter post I‘ll just leave loose, until he gets more of an interest. When I notice he’s playing it more often I'll start giving him the games in boxes on a bi-weekly basis.

    Edit: Oh yeah - I made a blog post with some more instructions and the script I made if anyone is interested
    https://copy-save.blogspot.com/2022/01/raspberry-pi-with-nfc-cards-for-my-son.html

    I got a couple of little projects done this past month.

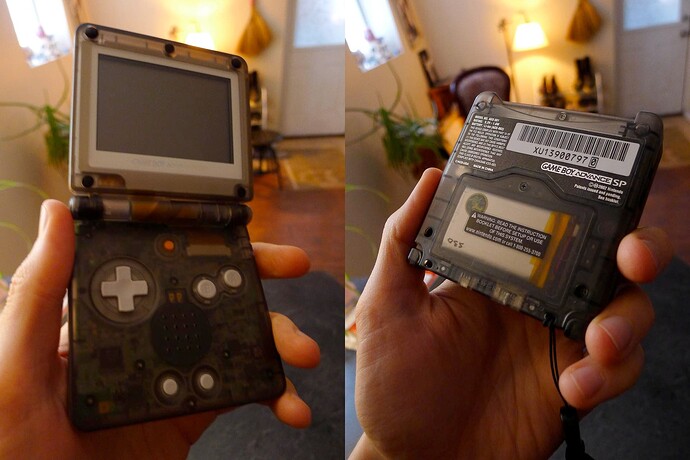
    The first is an SP that I restored and re-shelled. It was my friend’s childhood AGS-001 (and I’ve kept it frontlit). Cleaned the parts I wanted to keep, including all the metal hardware from the bottom case, most of the buttons and silicone pads and the speaker. Recapped it and replaced the R shoulder switch, upgraded it with the big honking makho battery that Retro Modding sells and a glass lens—which does have a single fleck of dust trapped under it that I will have to and can live with.

    I am all about wrist straps.

    I never had my own GBA, unless the DS lite counts. I’ve already played through a couple out of the bag of carts I grabbed from my mom’s place. The feel of popping this open and chipping away at a game is just not there with anything else I’ve had on hand.

    I love in particular the screen: how the colours of its games aren’t blown out and how the frontlight is easy on the eyes even in pitch blackness, how I can play in broad daylight or with a reading light, and how I can make out the subpixels plain as day. I’ve been meaning to replay Mother 3 for a while now and this is obviously how I should do that, because I’ve only every played it in emulators (or, well, I guess the 3DS’s gba.firm might actually be invoking native hardware to run, have I got that right? anyway, scaling and colours still suck).


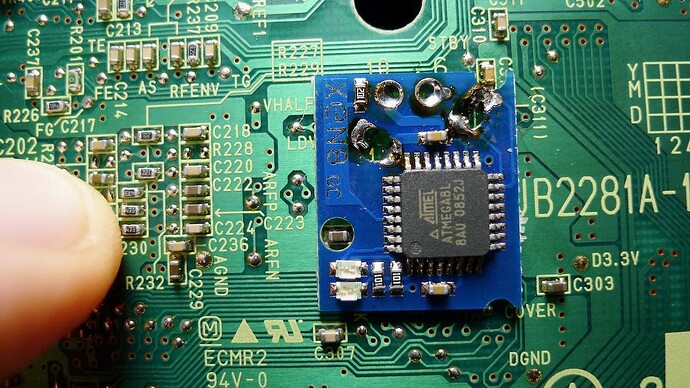
    The next project took a couple of tries to get right. I’ve had my GameCube for almost twenty years now. It’s small and cute, doesn’t take up a lot of space. I mostly keep it for sentimental reasons, as my Wii U plays GCN games pretty ok, but the vWii’s video out leaves something to be desired and not every original feature is supported. I started to think recently that I should show my cube some more love, and the components to do so are not expensive compared to things like the MODE or even PSIO. I’m talking of course about the Xeno GC drive chip.

    I had to order in a heatgun to remove the chip after I botched the initial install, and hot air stations are AN EXPENSE, so I got this thing instead. Its marketing and included instructions are pure cringe and full of dated memes, but it melts solder so I am happy. Removed as much solder as I could with wick, taped everything down with kapton, and blasted it. Then I cleaned up the site, tinned things properly and used a brand new tip for my iron—all things I should have done the first time. I’ve had my soldering iron for eleven years but it’s maybe seen more use in the past year than ever before that, so my skills have jumped recently and I’m starting to develop a respect for doing things properly.

    Last thing to note: since I picked up Swiss on a pressed DVD and not a burned one, there was no need to mess with the potentiometer and add wear to the drive’s laser. It’s something called a NickDisk and I need to mention it here because I cannot find any mention of it elsewhere, and people are upping the intensity of their lasers unnecessarily when this disc is nearly as cheap as the DVD-R minis you can get on aliexpress but are read as easily as any licensed game. Please take note.


    This last mod is nothing special, except to me.

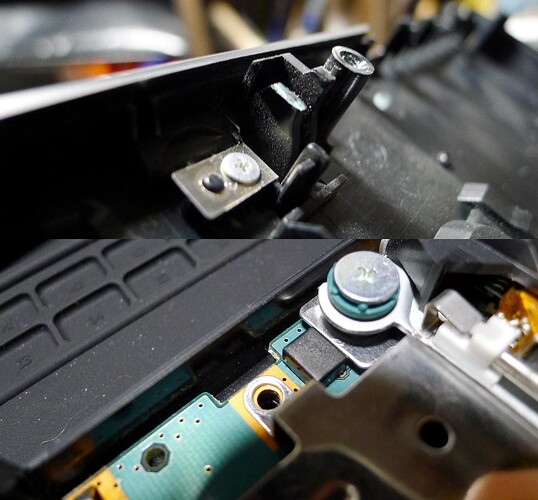
    I disabled the rear lid sensor on my PS2 slim.

    Upper photo: snipped back the plastic on the lid that presses the sensor down (in THEORY).
    Lower photo: part D from the Magic Switch Pro tool stuck securely onto that sensor.

    (The only reason there are two sensors is for DRM; the front sensor detects a shut drive just fine all on its own.)

    A tremendous source of anxiety to me for over a decade and a half, now vanquished.
    Usually I don't share my retro game setup but ever since I moved to my current home over 2 years ago I never got around to properly setting it back up again until yesterday (getting obsessed with Cleopatra Fortune did not help the matter)…

    I was just using a temporary and rather cable messy setup in the livingroom that has now been dismantled to make a more relaxed space and so that not everyone that visits can see a mess of monitors and old consoles anymore.

    I think it turned out okay, though thinking I need to build up a media PC to include in the setup.

    https://www.youtube.com/watch?v=irTyz-380Sk

    @“Suteneko”#p62047 is that a JVC in the center?

    @“Suteneko”#p62047 Gorgeous!! What signal splitter are you using there?

    >

    @“treefroggy”#p62053 Suteneko is that a JVC in the center?

    Yeah a 17" JVC DTV.

    >

    @“Funbil”#p62055 What signal splitter are you using there?

    An Extron Crosspoint with 12 input and 8 outputs. It is currently using 10 inputs and 3 outputs.

    Would like to get a monitor rotated into vertical TATE mode permanently into the setup but it would have to placed on top of the PVM to work.

    @“Suteneko”#p62101 Did you know…. that I also have a 17" JVC H-TM1750CG?…. and that it is my beloved child?

    Is DTV the one that has 480p? If so that is my white whale monitor. What year is it? my h-tm is 2006, a real unicorn, might last another 100 years, who knows. I‘m very into JVC professional monitors. Also jealous of the crosspoint, that’s what I want to use to output my PC to my CRT, if I had one, and if crosspoint is the extron device that does that in conjunction with 240p output software.

    You guys have some awesome hardware! At the moment most of my hardware consists of various wireless controllers.

    [upl-image-preview url=//i.imgur.com/eM3Kzkk.jpeg]

    [upl-image-preview url=//i.imgur.com/uZLszXA.jpeg]

    Made sure to pick a screen from a game that has hardware in it! I really like mister for the ability to output scaled video to a modern display and raw 15khz RGB without any extra stuff.

    [upl-image-preview url=//i.imgur.com/AowrOdu.jpeg]
    I was recently given this gameboy pocket which has moderate screen burn in the middle. I was thinking about putting an ips screen in, has anyone here done that with a gameboy pocket?